Showing posts with label Batteries. Show all posts

Sunday, November 13, 2016

Getting Wired Part 2

It has been a good weekend. In an update to the previous post, I did some more wiring on the boat.

Spent a few hours today working on actually mounting/installing the Pronautic 1230P charger I bought TWO years ago. I recently ordered a couple of Firefly batteries for my new house bank. Since I want to make sure the batteries are taken care of, I had to get the charger set up. I ordered some 10/2 wire and some ring terminals from Genuinedealz to connect the charger to the batteries. While time consuming, it wasn't too difficult. I mounted the charger to a couple pieces of oak I had laying around and went head first into the starboard quarterberth to mount the setup to the bulkhead. A little tight but manageable.


I routed the new wires the same way they were with the old charger directly to the battery bank. When I flipped the breaker on the panel to turn on the charger, a fan started and in a moment, a click started charging to the batteries. Very happy this worked out. I don't have a starting battery yet and will run wires for one when the time comes. When I left the boat today, I turned on the vent fan that came with the Airhead for ventilation. The Airhead website said the fan draws .08 amp. So I figured even leaving it on for the week, or even two weeks, it wouldn't drain the battery too much, too fast. And now the charger is in place, I can top off the batteries during my visit.

In my last post, I mentioned ordering a panel from Front Panel Express using their software. Well, it came in and I'm pleased with how it turned out. Black anodized aluminum with engraved letters filled in with yellow, 7"w x 3.25"h. Everything lined up nicely for the toggle breakers. I'd say this was a good test panel for the possibility of changing the main breaker panel by the companionway. Changing the main panel isn't a near-term project but something I can play around with in the design in the meantime.

First look in the box. Vacuum sealed on cardboard.

only have two breakers at the moment

got a bus bar made for attaching the main positive line

This panel will be mounted just under the front of the nav desk where an old cassette car stereo was mounted. This will be used to wire the VHF in its new location, just above the nav desk. Later, perhaps other items. At least it won't require multiple wires to be sent back the main panel, keeping the wiring clutter to a minimum.

Lastly, the mast. The shop I'm having do a paint job is also doing a few modifications. They changed the setup by the masthead. This will help keep wires and halyards from interfering with each other. They're changing the location of the conduit for running wires up. Instead of being on the back side where the track is, they installed a new one on the front side of the mast.

The anchor/tri-color light was in the middle of the masthead and now on its own pedestal on the side. The wires will run up the middle of the tube instead of being external. They also patched up a lot of holes, the largest being the hole from the baby forestay that I didn't intend on using and also a hole used for a box sheave. They patched up a few smaller holes around the mast and boom that were mostly unused. A new location for the VHF antenna is also installed. Soon, it will be sent for painting and then the hardware will be reinstalled.

The guy at the rigging shop suggested connections shouldn't be outside of the boat. So he's talking about putting a short tube on the mast step that will go down a bit (maybe 1") into the deck. Then connections would be made inside the boat at the bottom of the compression post. I'll still have to see how big the holes are at the bottom of the compression post to see how feasible it would be for any connectors to pass through. Below is a picture of a tube on the mast step at the shop I used to visualize what it might look like. The final product certainly wouldn't be as high as in the picture. Should be shorter that would still allow the mast to be stepped/unstepped by an owner.


 At this time, not much to update in regards to the insurance claim on the fallen tree hitting the boat. I've been told I need to contact workshops to get detailed quotes for getting the damages fixed.

Lately, I've been side tracked, or maybe distracted, from a couple projects due to focusing on the mast and the tree damaging the boat. I hope to get back on track and tackle the major projects I've been working on over the summer that still isn't quite done yet.

Thursday, November 3, 2016

Getting Wired

The mast is now sanded down. Used paint stripper to get out the paint in the tracks. I recently went for a short visit to the boat to talk with a rigger where we chatted about additional work to be done. All to prepare it for repainting.

They should be stopping by the marina to pick it up soon.

I setup new batteries for the house bank, in place under the starboard quarterberth. I ordered wire that will connect the batteries together and got to use my hammer crimper for the first time. I think it turned out well and finished nicely with heat shrink. I'll shorten and finish the other end when I'm at the boat next time.

4 gauge to connect between two house bank batteries
heat shrink in place
I was looking over the current wiring beyond the battery bank, on top of the fresh water tank and looking to redo some of them. Current wiring that went to the batteries had 5/16" terminals but need to be changed to 3/8". In general, I think it could be cleaned up a bit, with identifying where they go and putting some labels on them.


Now the mast will be away, I can get back to other projects.

One of the other projects I'm working on is putting together an electrical panel with breakers by the nav desk. I originally wanted to use a bus bar to connect the new VHF in its new position without running multiple wires back to the batteries. Someone suggested I install an actual breaker panel to make sure power is disconnected so went with that idea instead. There will be enough positions for breakers to add a few other items if/when the time comes to expand the electronics.

 I ordered the panel through Front Panel Express using their free software was pretty easy to put together. Black anodized aluminum with the HIN engraved into the panel. The breakers are Blue Sea A-series. Blue Sea is nice in that they have the dimensions for hole spacing and cutout templates for their products.


Next post I'll show the panel after it arrives.

Saturday, January 10, 2015

Winter slow down

No, I haven't gone anywhere. This time of year, things slow down and like most people, it's just a matter of staying warm. In the meantime, there are winter projects and project planning.

I've sold the Garmin 546s. Didn't take long for that to sell. I intend to upgrade to a nicer chartplotter and integrated radar.

I've been looking over where and how I'm going to mount the Pronautic charger.

Still working (slowly) on building a new battery box that will hold two Group 31's.

Varnishing the rudder cheeks and adding a few coats to the tiller.

And, I just made a few orders for supplies on other smaller projects that I'm waiting for a couple more things to come in but here's a picture to show what I have so far. Just not going to talk about what the projects are just yet, but I have some wires, a strap and hardware. :-)


Checked on the boat today. I thought I left something I needed on the boat, then realized what I was looking for was in the truck. I saw the pink anti-freeze was frozen in the water filter for the engine. From what I've seen, it does freeze, just doesn't expand (maybe when it gets even colder?). Decided to look in the bilge and saw it's frozen too. I really need to dry that out as soon as it warms up again. I'll keep a close watch on everything as this winter continues.

Not much but that's the latest I'm up to. Hopefully soon, I'll find out where I'll be moving too for work and will then have to sort out where the boat is going to be stored at later.

Stay warm out there!

Saturday, April 28, 2012

Sunny Day

Today was a nice day so I did some work at the boat.

First thing I did was to replace the battery switch. It went pretty good. One cable seemed to be slightly short so it was difficult to reach the connection. Because of how the cables were connected, it ended up being mounted upside down. It still seems to work fine as it is.


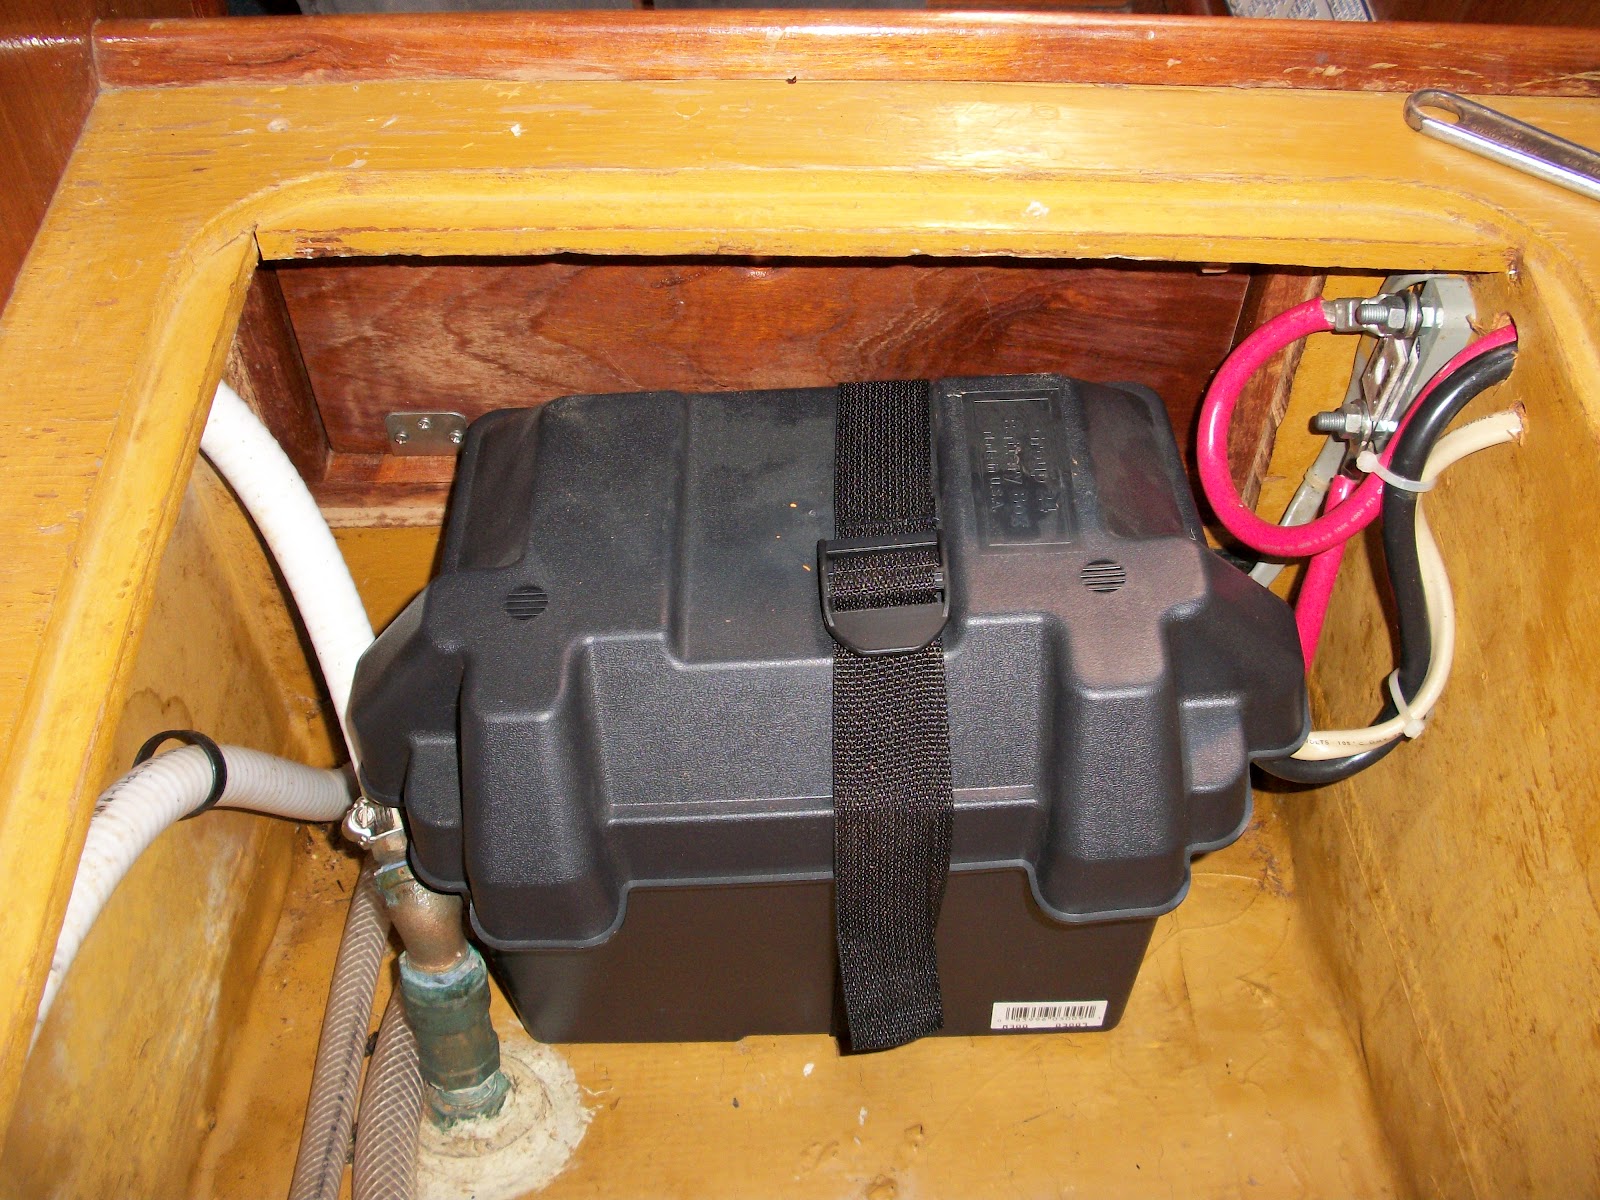
The other day, I bought a couple batteries from Sams Club, both marine AGM. One was a Group 31 replacing the 31 I took off for the house battery. The starting battery I got is a Group 34 replacing a Group 24. The old battery box was broken so I replaced that too.

Here's the house battery.


The battery fit well in the battery box I found.


I mounted the strap to tie it down just inside the compartment.


Everything went together quite well. Here everything is strapped down nicely. With the space inside this compartment, I could probably add a second battery but I'll just stick with one right now.


I started taking things back to the boat to empty out the house. I took the cusions, sails and a few other things.


Another thing I was working on is figuring out the electric bilge pump. I thought the cable had slipped off. I lifted the wood the pump was mounted on to check and saw that the output was broken off and still in the hose. I'm thinking to order a new bilge pump. Then, I can put a more flexible hose on the end so it will not break again. The hose heading to the through-hull is very stiff.

Friday, April 27, 2012

Rainy Day

Today was a bit rainy so not much work was done at the boat. Even with lightning flashing around the area, I still setup my metal ladder and visited the boat for a moment. Probably a good thing I did. I found a screw used for one of the hand rails above had drops coming down. I will need to reseal that screw and probably should do all of them while I'm at it.

Here, you can see the drop showing up the the discoloration of the wood nearby. The drops were pretty steady and this part of the handrail was not covered by the tarp currently on top.


Good news is the gaskets on the portholes are working nicely. Here, you can see the water collecting at the bottom. I used a flashlight to find water dripping and everything was dry.


It was nice to see the wood that I scrapped the old varnish off of. Some of the grain showed up dark and I think some of it was from the grey areas. I'm pretty sure I scrapped off the varnish pretty well too. Still, seeing how some of the grain shows up is nice. I am looking forward to getting some fresh varnish on it.


Something else I noticed on the boat is a thru-hole item. I had to look it up and found that it is a transducer used for depth, Airmar P319. I thought it was odd that the cord was still coiled up so I assume that it was a fairly recent upgrade/addition from a previous owner. I looked at the compartment where the cable would be routed and saw a plastic housing that might have held an old transducer. This other one had the cable routed toward the stern. So, another project, take the old plastic housing and cable out and route the cable for the mounted transducer. Oh and I found out the cable connects to the Garmin 546S.


Lastly, I got a new battery switch in the mail today. The case was slightly deeper than the old one so I had to go to the store for longer screws. I'll update how that looks in another post.

Friday, April 20, 2012

Battery Switch

Looks like I might have an additional project. This time involving electricity, or maybe just the cables.

While working on using jumper cables to power the boat from my truck, the knob for the battery switch came loose. I tried using a screw driver to get the knob off so I could see if there was a way to tighten it but the screw didn't move. I actually ended up stripping the head of the screw. So now, I have a switch that seems to be stuck in the Battery 1 position and the knob itself moves freely.

The knob isn't supposed to be pointed in this direction.


UPDATE: 26 April 2012

Probably a good thing the knob on this broke while I'm working on it and not while out cruising around somewhere. I took the switch off to get a closer look at it.

The backside was pretty well cracked.


To me, it didn't look good. I think these things are supposed to be sealed from weather to keep from getting corroded. I took a screwdriver to get into one of the cracks and pried it open.

As you can see here, the contacts look ok and the grease is still free flowing. The only thing is the two posts on either side from the center.


These two posts were clean broken from the knob on the other end.


If these posts were still holding on, I would not have been able to separate the two halves very easily. A replacement battery switch should be arriving soon then I can update again the new install.


Tuesday, April 10, 2012

Batteries

There are two batteries on Rhapsody. Battery 1 is the house battery. It's used to power lights and electronics. Battery 2 is the starter battery which is used for starting the engine.