While looking around for spare parts for my engine, I came across this website that has Parts Catalogs for Yanmar engines.
http://www.lsm-diesel.dk/2012/common/menugen.php?sprog=uk&kode=&umenu=500
What's nice is that there are diagrams for the engines with an exploded view and a list of parts that go to certain places. You can be sure to find the correct part knowing where it goes too. Just note that some part numbers may have been updated. Also be sure that the engine type is correct. While I have a Yanmar 2GM, the parts for a 2GM20 could be slightly different. There are separate files for each.
Torrenson Marine seems to have a large number of parts online and if doing a search for a part, their website may inform you of an updated part. So if you're like me, do the research and be sure you get the right part.
I hope this can be a useful resource for others.
Thursday, May 30, 2013
Friday, May 24, 2013
Memorial Day Weekend
Yesterday after work, I went to the storage place and moved the boat to another part and strapped it down for transport. I got a strap and wrapped it up over the boat attaching it to the trailer.


Today, I got up early, hitched up the boat to the truck and got on the road to the marina. The marina is called Green Turtle Bay which also has some cabins/houses for rental and lots of large motor boats, house boats and some sail boats. The marina opens up to Lake Barkley in Kentucky. The marina is about an hour away from where I live. I arrived there around 8am.

I had to wait for the overall manager to come by to talk to then they got it strapped up on the travel lift and lifted it off the trailer.

My boat is dwarfed in comparison to the other boats they had in the yard. This one is called a Sea Ray 52 Sundancer.

anyway, once it was sitting in the travel lift, it was moved out of the way and then the workers got the mast off the trailer and set it up on stands for setup.


By then, it was lunch time. I walked to the other side of the marina to the little restaurant and got a burger. I went to the dock where my boat will soon be and found a guy working on his boat that he got together with his dad and looking at going through the rivers down to the Gulf. We talked for a while then I walked back to the yard just in time to see one of the guys spraying down the bottom getting the old layers off and getting it ready for paint.

It was a beautiful day today and I spent most of it there at the marina. My arms, face and neck are not just red, they're glowing. Still, I enjoyed my time and it's exciting to see the boat getting closer to the water. The yard is also going to setup the mast and check a couple other things for me and it may be in the water in a week or two.
This will be the first time it's been in fresh water and possibly the first time it's been off the trailer in maybe a couple years.
I got to see lots of turtles floating around in the water or others, like these two, that were sun bathing. Usually, they would dive quickly when I walked nearby.


Saturday, May 18, 2013
Seacock Project - Complete
Today was a good day.
I found out that the carpet pieces are attached with Velcro strips. I was thinking to change them out sometime so this might be easier than I expected. This project can wait but I can still look and see what's available.

I continued the work on the water strainer. I attached the fittings to the strainer then the hoses. Since I ordered 2ft of 1/2" hose, I had to cut it down. I attached it to the pump on the engine first then ran it to the strainer for measurement.


When I attached the 3/4" hose, I filled the reservoir of the strainer with water to prime it, then got a bucket full of water and ran it through the engine. Engine started up right away and sounded quite nice.
I then cleaned up the thru-hull and flange base of the seacock. I marked off the area around the fiberglass base with tape. I used Sikaflex 291 for the base and the thru hull.
The following is pictures of the work.


Once the thru-hull and the seacock was mounted, I attached the hose with two new hose clamps. All the hose clamps I used were new. On the 3/4" hose, I used two on the seacock and the strainer input and on the 1/2" side, I used one on the strainer output and one on the raw water pump.

I'm happy this project is finally completed. I really hope everything holds together when getting the boat in the water. This was an important project. I learned a lot about this project along the way and feels good to finally be done with it.
Saturday, May 11, 2013
Project Touchups
Today was a busy day. The weather was nice and cool since some rain came through the last couple days. It's been mostly cloudy today but the sun is finally showing up in the afternoon.
I started off the day working on installing a new water strainer. I bought a Groco ARG-500 from Hopkins-Carter and it got here pretty quickly. I ordered fittings for it from another source and waiting for those to come in a couple days. Then at that time, I'll add the fittings and get some hose to go with it. I had to take off the little one that was already there. I cut the hose going to the water pump, then unscrewed the bracket behind the strainer.


Up close, you can see that someone used to be able to see through this.

Here's a size comparison between the old and new strainers.

First attempt at mounting the filter, It looked like it might interfere with part of the engine...

...so I moved it down a little in hopes it will be clear of any engine shaking/vibration.

And the mount itself.

After installing the strainer, I used a dremel to grind out the threads from the epoxy when I installed the base for the new seacock. I wanted to get the thru-hull to go through and thread only into the flange base. I didn't get any pictures of this process. Since there was a lot of dust associated with this, I used the shop-vac at the same time which really helped to keep things cleaned up.
I used the little shop-vac to do some general cleanup around the boat. I also vacuumed some loose debris in the head. I vacuumed up the storage spaces around the salon/seating area. I decided to show just how much storage space there is in the Nor'sea. The white card I placed is the size of a credit card, so you can get an idea of the space available. The same space is available on both sides.


When I cleaned up to the forward storage locker, I took the sails out and decided to take the rope and chain out of it too. I only measured the chain and I planed on measuring the rope too but didn't do it just yet.

I lowered the anchor to the ground so I could stretch it out for measurement. It turns out that there is 140' of chain in this pile.

I went to a hardware store and bought some bright orange and yellow spray paint. While there are marks on the chain, I wanted to put new ones on that were a little brighter. I put the orange marks at 25', 75', 125' and yellow marks at 50' 100'


I installed the chain back on the boat once the paint dried. I didn't see any attachment points for the chain or rope and looking at installing something to keep the anchor from getting away from me.
When I look around online and see forum posts where people are looking for a boat with a lot of space because of their height, I think that you can't have everything. I'm 6'5" and I can not stand up straight while down below but I can still fit comfortably when I'm laying in a quarterberth or when the salon is converted to sleeping space. I don't feel at all cramped in my boat. I've now been in every part of my boat and don't really have any problem reaching into any part of it. Now to show that I've been IN every part of my boat, here I am sitting in the sail/anchor locker. :-)

Monday, May 6, 2013
Preparations Continue
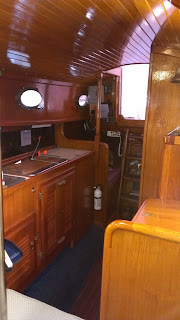
In preparation for getting a survey, yesterday afternoon I cleaned out the boat. The main sail and the boom was on the cabin floor but now the main sail is sitting in the living room and the boom is sitting on the deck. Much of the loose stuff that was sitting around, like tools, sandpaper sheets, extra bolts, etc., were all put in boxes and taking up space in the truck. I did a little bit of vacuuming up too.
I thought I would post a few pictures of the inside.


Also yesterday, in the morning, I went up to the Green Turtle Bay Marina where I am expecting to have the boat. There were a few people around. Looked like some were getting their boats ready for the summer. I talked to a guy who has a boat in the slip right across from where mine will be and he talked about water levels and where to get good info for lake conditions. He's been there for at least a few years and seems to be a good source of info.
I wanted to see which side of the dock the slip was in. There is walking space between each boat with three cleats on either side. It was a little cool out and it was rainy through the weekend so not too many people were around. It is pretty quiet and relaxing. I'm expecting to spend as much time as I can at the boat, mostly on the weekends. Who knows, maybe I'll sail out in the lake and spend the night at anchor in a small bay. Before I left the marina, I walked around the shop that has some maintenance supplies along with t-shirts and other items for enjoying time at the lake.
Saturday, May 4, 2013
Impeller Installed
I installed the new impeller I bought at West Marine.
I used the lubricant that came with the impeller and coated it and the pump housing. I installed the Speedseal cover with the thumb screws but used a pair of needle nose pliers to tighten. At first it wasn't pumping and leaked a lot so I had to keep tightening the screws for the cover. I got it pumping water again. The engine started right up quickly on the first try and the additional times when testing the pump. I'm hoping it will continue to function throughout this sailing season.
I put the camera behind the pump to get a shot of it. I wanted to see that I had the fins on the impeller were facing the correct direction. Looks like it will need a good cleaning. At some point, I'll take the pump off of the engine and give it a good scrub. Since it looks like it might take a while to do, I may wait until after this season to work on it. It will definitely be worth cleaning up since new ones are pretty expensive. This is why it's important to do regular maintenance to keep things in working order.

Subscribe to:
Posts (Atom)