Sunday, August 24, 2014

Rudder Cheeks

Just thought I'd start this post with a side profile of the boat when I showed up today. I continued using some compound on the last part of the port side. On the starboard side of the hull, I wet sanded by hand with 600, 800 and 1500 grit sandpaper. Used a spray bottle of water to wet down the hull. I started doing compound on the starboard side but got about a third of the way through then decided to call it a day. Temps got into the mid 90s with heat index forecasted at 100-105F. I was drinking plenty of water but I didn't want to over work myself in this heat.
 
Once I decided to stop using compound, I grabbed some tools and removed the rudder cheeks. I think they're made of mahogany and they're pretty big pieces of wood. The top of them, where the metal backing is at is where the tiller attaches. So, like the way I refinished the tiller, I'm going to refinish these pieces too. Instead of reusing the old carriage bolts, I have some new ones with hex head on them that will make it easier to remove later if needed.


Monday, August 18, 2014

Check Your Chainplates

I've heard it before by others for everyone's awareness to check chainplates. Other owners of a Nor'sea 27 have changed out their chainplates on 30+ year old boats because they saw cracks or ended up finding out there were cracks in them during removal. Like the old saying goes, nothing lasts forever and these chainplates are no exception. One owner took his chainplates off and while making the video, one broke in his hand.
 
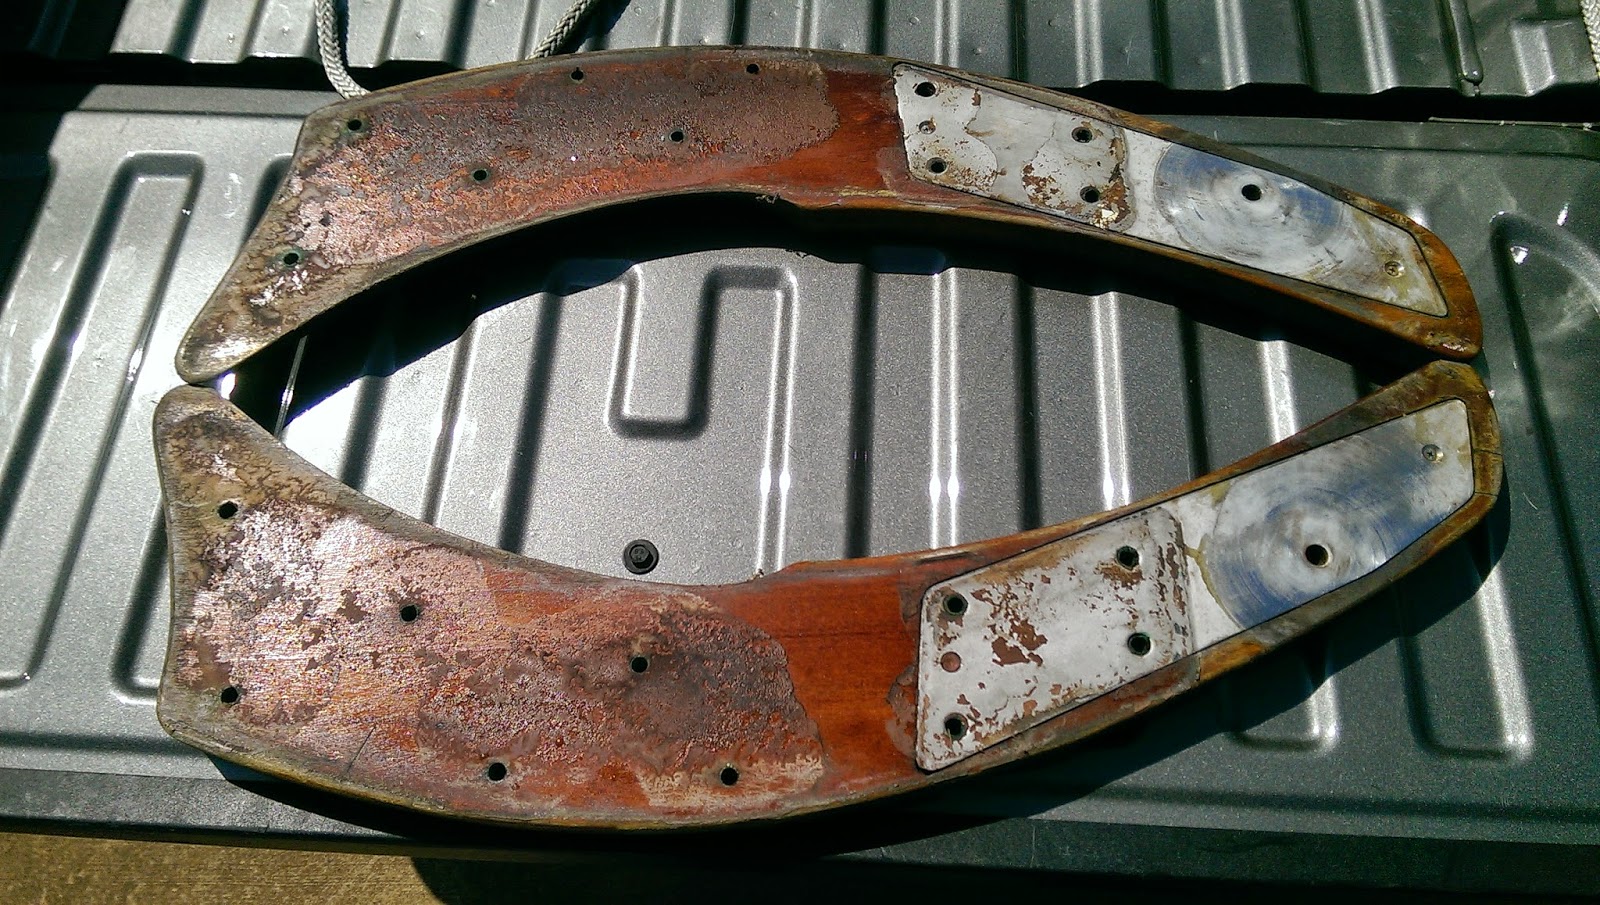
While removing my chainplates, I noticed. some pitting and surface rust. They didn't really look TOO bad to me and still felt pretty solid. Then, I was down to two. The bow and the aft chainplate on the port side. The bow took a little time as it was flush with the surface and didn't want to lift up at first. The last chainplate on the side was another story. Each plate for the shrouds have a little block of wood for spacer. The bolts going through them stayed solid in place until I banged them out, but prying the plates from the boat was difficult because the bolts didn't budge. When I went to pull the last chainplate, it gave a little.
 
I thought it was odd since all the others were pretty sturdy but now I got one with a soft spot. Turns out, there was a hidden crack in it. It was hard to see at first but once I removed the spacer block, I pulled on the plate to exaggerate the bend to show the crack easier. It went right to the bottom of a bolt hole. It ended up leaving one bolt holding the half-shroud that was attached to it.
 
Can you see the crack?

How about now?
 
Pulled it to have it show up more
 
You can see the crack here with one bolt before the shroud attachment

Broke to show how much metal (on the left) was actually holding it together.
This is how the boat looked behind each chainplate.


Here I am, sitting inside the sail locker removing the nuts holding the bow chainplate in place. Just shows that a guy my size (6'5") can fit anywhere in my boat (mostly).

 
While I didn't take pictures of the chainplate areas after I cleaned them up and sanded, I can say their areas are looking much better, at least on the port side. I've started doing some sanding on the port side. I used 400, 600 and 800 all dry. Then, I read something that the sanding should be done wet so when I went to 1500, I used a spray bottle to wet the areas and sanded some more. It's looking much better so I hope this whole process is worth the effort.
 
I also have a compound that I found. It's made by Meguiar's and it's listed as a one-step compound. I also got a paste wax, Collinite Heavy Duty Paste Fleetwax that I'm hoping to bring the hull to a nice shine.
 
Here's how it looks after some compound. It'll need some more work but it's getting there. It probably hasn't been done in many years so anything is an improvement at this point. This is the first time I've done it since buying the boat a little more than 2 yrs ago.
 
 
Another project I'm looking at doing while the chainplates are off the boat is to repaint the blue stripe up by the toe rail. My favorite color is dark red. So, I looked around at topside paint and decided to get one in the color I want. It's Burgundy by Pettit Easypoxy. I'm thinking of re-painting the waterline too but not sure now if it's the right paint for it. Maybe someone reading this could advise me on this. The waterline will wait for now so no hurry. The top stripe is needed sooner before I get new chainplates in place.
 
Here's a quick snapshot of the color I bought. So more sanding, prep work and priming, etc.
 
Doesn't that look nice? :-)
Plenty to do on this old girl but it'll be worth it in the end.


Saturday, August 9, 2014

Glassed In Bolt

Here's a video of the Airhead toilet I installed. It's more of a review to show how I have it installed as my head compartment is not very big. I find it is a good fit for my boat.


I spent most of the day trying to remove panels in order to remove just ONE chainplate. The panels were long so I couldn't pop them out or slide them out of the way once the screws were removed. So, I took a Dremel and cut one piece enough to get a small fine toothed saw blade into the cut so I could cut down on other pieces to expose the bolts. I had an interesting surprise when I removed them. The bolt on the very bottom of the chainplate, was glassed in. I used a different bit on the Dremel and cut away the fiberglass around the bolt enough I could get a wrench around it to move it. Once the fiberglass was cut away, the bolt was easy to remove. The top bolt was harder to remove since it was up and behind another panel. The little shop-vac was necessary anyway to draw enough amps from the 1000W inverter on the truck for the Dremel to work. In a way, it almost felt like doing dentist work with the drill and suction. Sounded about the same.

Used Dremel on top panel that was cut

Used this blade to cut the rest by hand.


A couple more chainplates, and I'm done with taking them off the boat. I'll have to do the same process for the last port side chainplate. I also took the tiller off the boat to bring home and will put a couple more coats of varnish on it. Mainly to clean up a few scuffs. I was going to bring the rudder cheeks home too to refinish but decided that can wait for now.

I was looking at some info online about hulls and gelcoat and it got me to thinking about how nice of a finish others have on their boats. Looking at my boat, I would say the gelcoat is in really good condition. Looks nice and smooth. I'm thinking to use some compound and wax to get a nice shine on the hull. I may be able to just do a test spot to see how just a compound/wax would do before going through the entire boat.

Saturday, August 2, 2014

Some Dis-Assembly Required

Part of this refit is to break things down in order to build it back up again.

I'm looking at doing a few things at the same time. I want to repaint the blue near the toe rail to a dark red. Not sure what type of paint to use yet. I've looked at Interlux Brightsides, Pettit Easypoxy, Awlgrip and whatever else I can find. Brightsides has "Fire Red" but to darken, would require some mixing. Awlgrip and Easypoxy has dark red and due to costs, I'm leaning toward Easypoxy, unless I find something else or a different kind is suggested.

In order to prepare for this, I removed the name off of the port side, not yet on the starboard. There was a sticky residue left over after I scraped off the letters. I looked up online what could be used and saw something about acetone. I tried it and it cleaned it up nicely.


sticky residue left behind after scraping

after acetone cleaning

I also used an electrical palm sander a little bit. There was a spot that sanded through to a darker color underneath and a spot that was chipped. I'll have to sand down some more but not sure how far to go at the moment. What ever was used for the current color, there was a little bit of a reflection on it. I might sand it smooth, put on some primer and put whatever I get over it. With a new color, I can then add new set of letters for the name, whenever I get some.

Sanded through to a darker blue

I plan on replacing the chainplates. Not because they're bad. Actually, they don't look too bad but they're old and for preventative measures it's good to make sure they're updated. Removing them from the hull sides, it will give the repainting an even surface.


Removing stern chainplates
The sides were not as accessible. I had to remove the panels to get to the bolts for two of the side chainplates. The same way on both sides. The big washers on the sides were epoxied into place so they're not coming off. After getting the chainplates off, I just needed to scrape some of the caulking that was used off the boat and the chainplate.


The third chainplates on each side will be a bit more difficult. The panels are not setup in a way to pop off or slide out of the way. Looks like I might have to cut away some of the paneling and add some trim to hide the cut. At least that's an idea I have. One side, I have the galley and the other side, I have the nav desk. The panels behind each extend behind another piece of wood or bulkhead. So creativity is needed.


Overall, I got the two stern chainplates and two from each side off. I still have the third chainplate on each side and the one on the bow to remove.

So, some disassembly required.