Showing posts with label Yanmar. Show all posts

Sunday, January 21, 2018

Engine Wire Harness

It's been a little over a month since I visited the boat. One of the inspection ports on the fuel tank, while covered, wasn't bolted down. I decided to bolt it down and saw water drops coming out from the rubber seal. I opened it up and found the tank almost full of water. Surprising as I didn't realize that much water was in there. When I first installed new seacocks for the cockpit drains, I didn't put sealant on them right away. At least, not until I saw a little water sitting on top of the tank. Didn't think then to look inside. While the tank was filled with water, the bilge was dry. So, it'll at least hold fluid. To get the water out, I decided to get one of the water hoses laying around the boat yard to siphon it out. Went to the local hardware store to get a drill powered pump and got it started. once the siphon started, I disconnected the pump so it would flow out on its own. Then went inside to make sure the hose was at the bottom of the tank.


I left the inspection port uncovered so any moisture in the tank could evaporate. Good thing I removed the water when I did. The temperatures the past month has been in the 20s (highs) for quite a few days at a time. don't need that freezing.

The seacocks I installed are now sealed up, but I only have 3 installed. I still have one more to install for the cockpit drains. It'll take a little more time to get that setup as it's next to the little shelf the old water-lift muffler sat. So the backing plate is probably going to be triangular instead of round like the others. The hose on the seacocks are a bit annoying. Every time I try getting them on, they don't go very far and can get only one hoseclamp around it. For some reason, not enough hose gets on the barb for two clamps. I've been using Dawn dish soap to lubricate the hose and barb, but still nothing. They sure are a tight fit.

This weekend, or rather yesterday (20 Jan), I visited the boat and installed the wiring harness on the engine. Finally found a reference in the service manual... on the very last page... for were the wires went. The wires are color coded so that helped. There was a couple things I wasn't quite sure on so I looked at older pictures I took to see where they went. Now, the only thing left is to run a power cable from the battery supply to the engine. I have some 4 ga. wire laying around that I can use, and just need to order connectors. I'll get them from genuinedealz like I did previous times.


Some of the little stuff is what really adds up in getting things ready. So, in addition to running power to the engine, I still need to reinstall the exhaust hoses and new water-lift muffler. I also need to connect the fuel lines, make a vent hole in one of the inspection plates, install new stuffing box, replace cutlass bearing and some other things before I get to working on the bottom to prep it for barrier coat and bottom paint. I hope to launch this year, but like always, we'll have to see how things go along the way.

I recently ordered brakes for the trailer. I was thinking to work on that this weekend but right now I'm looking at putting the effort towards the boat to get ready to sail again first. Until then, the brakes are sitting at the house. I'll post more on that when I actually do the work on it.

Sunday, July 16, 2017

Engine Installed & Inside Cleaned

July 7th, I got up early in the morning, still dark out, and put a ramp I made on the bed of the truck and pushed my engine into the bed. This day was to put the engine back in the boat. The engine, a Yanmar 2GM, has been sitting in the garage at the house for the past 1.5yrs.

The marina staff were busy a good part of the day launching three boats so I had to wait a while. Once they got to me, the owner put a boom on the end of the forklift, got the engine out of the truck and into the boat. The engine was set just below the companion way, where it sat for two weeks.

Ramp fittings on end of 2x8 board 10' long


Making sure I got spacing right

Pushed into the truck bed

ready to go at the marina


quietly waiting

Fast forward to 15 July, I left the house early, again. It takes about 1.5hrs to get to the boat. By the time I arrived, it was almost 7am. The tarp I had over the cockpit last visit wasn't doing too well. Water was pulling it down and stretched over the rails, it was tearing apart. I was sure water got in the boat from recent rains.

Once the tarp was pulled off the boat, I got to work. I've been doing a lot of work on the boat for the past couple years so it was getting dirty. I took everything off the boat that wasn't put away somewhere. I vacuumed then cleaned/dusted the galley and the salon/v-berth areas.

that's a lot of stuff

cleaned out nicely

been a while since it was this empty

a glimpse into some of the mess

Next thing I did was having to move the engine. While I can write about it, this video explains how that worked out.


Once the engine was in place, I started to put things back into the boat. I started by vacuuming the cushions. Not only were they dusty, but they also had some fiberglass pieces on them that needed cleaned up. I plan to replace them in the future but they will be usable for now. I started to clean things and put things away, but after a while, the sun was getting low so I just piled stuff into the quarterberths where I will organize during future visits.

One thing I should mention, it was HOT out. The thermometer on the boat said 95-97° most of the day. I was sure I was drinking water about as fast as I was sweating it out. My clothes were getting soaked and my eyes were burning from the sweat and red/sore from wiping it off.

I cut out the old seacocks and hammered out the thru-hulls from the cockpit drains. I used a reciprocating saw I just bought in order to cut through them, then a dremel to cut through the nut holding the thru-hull out. I ended up going to Home Depot to buy some 1.5" hose and using that for now to keep water draining out of the cockpit when it rains. This solution will work out temporarily until I can get the new seacocks installed.

With the engine out of the way, I was able to check the bilge. Turned out, it was full. I routed the hose for the manual bilge pump back into the bilge, went up on deck and pumped out most of the water.

Lastly, before leaving, I decided to try setting up the dodger for the first time. The previous owner told me a little about how it went together, but I haven't set it up myself yet. Trying to get the hand-holds on were frustrating so I left them off for now. I'll try looking at them again next time. The cover was very tight against the frame. I'm looking to replace the dodger canvas in the future to a different color. Right now, it'll work out for now to protect the companionway and to divert rain water away from a couple spots that are a little leaky.

I didn't take pictures of the dodger but will post here when I visit next time.

But here is the dodger laid out in the driveway as I was identifying the pieces.


Saturday, June 25, 2016

Hand Cranking the Engine

I ran the engine today for the first time since the test start I did immediately after the rebuild. Started right up and I let it run about 15-20 minutes. Out of curiosity, I decided to try out the hand crank since the engine was well warmed up. Started up pretty quickly, but I think it's only because it was warm. I'd hate to see how it would go if the engine was cold.

It's quite a work out trying to start it manually. I had to take breaks between attempts.

After several failed attempts, I was able to start it a second time, and more attempts after. Like I said, it's a work out. Heart beat pretty hard while cranking this engine.

But, I got it working. I was able to get the third start on camera.

Monday, March 28, 2016

Engine Test Start

As shown in my previous post, I put a lot of work into my Yanmar 2GM. Here's a clip of me testing the engine in the house garage. Once I got it going, I went through 4 or 5 buckets of water. I was having fun running the engine for the first time since taking it all apart. The engine was shaking so much that it was trying to walk across the garage so I had to stand on the support I made trying to keep it in place. I had the water strainer from the boat in line because it just happened to have the right hoses for the water pump to run cooling water. Vice grips was used for throttle to keep the RPMs up.


Here's what I did to the engine:
  • new head gasket
  • new thermostat housing gasket
  • new thermostat
  • new temperature sender
  • new rear zinc cover gasket
  • new.... lots of copper gaskets
  • new exhaust mixer
  • new steel fuel lines
  • new steel oil line
  • cleaned up the valves with lapping compound
  • auto shop did a hot cleaning and milled / smoothed the valves side of the head
  • new rear zinc w/packing (packing didn't seem to be used before)
  • new cooling hoses
  • new fuel filter
  • new fuel pump
  • painting with VHT engine primer and paint
  • cleaned out layers of rust from the exhaust port
  • cleaned out built up carbon from exhaust valves (pretty much clogged)
  • new valve stem seals
  • JB weld the exhaust port to smooth out the surface for the new exhaust mixer/gasket
  • cleaned out clogged cooling passages (mineral buildup and lots of debris)
  • replaced both pistons after finding one had a crack
  • cleaned out the oil pan
  • replaced oil pan gasket
  • cleaned surface rust around the block
  • cleaned up most of the rust from the flywheel
And gave it a lot of time and patience it desperately deserved.


Saturday, March 26, 2016

Engine Rebuild

Since buying Rhapsody, I've only ran the engine a total of around 10-15 hrs. With a disconnected hour meter showing 716 hrs., Total engine hours is around 730-740 hrs. Everything seemed to work fine with it, mostly. There were times it would have a sluggish start. I figured it was because I needed to bleed air out of the lines...

As they say with boat work, it'll take twice as long and cost three times as much. Well, in this case, it holds true as this took a LOT longer than expected. Just remember, with what you're about to see, was a working engine when I pulled it out.

I originally planned to change out a few rubber hoses, replace zincs and clean up some rust. As I started to take things apart, I discovered something else that needed some work and that cascaded into somewhat of a rebuild. Not a lot of space on the boat to do this kind of work. I drained the oil then I started taking a few things apart that I could take back to the house to work on when I wasn't visiting the boat.


Flywheel after transmission was removed

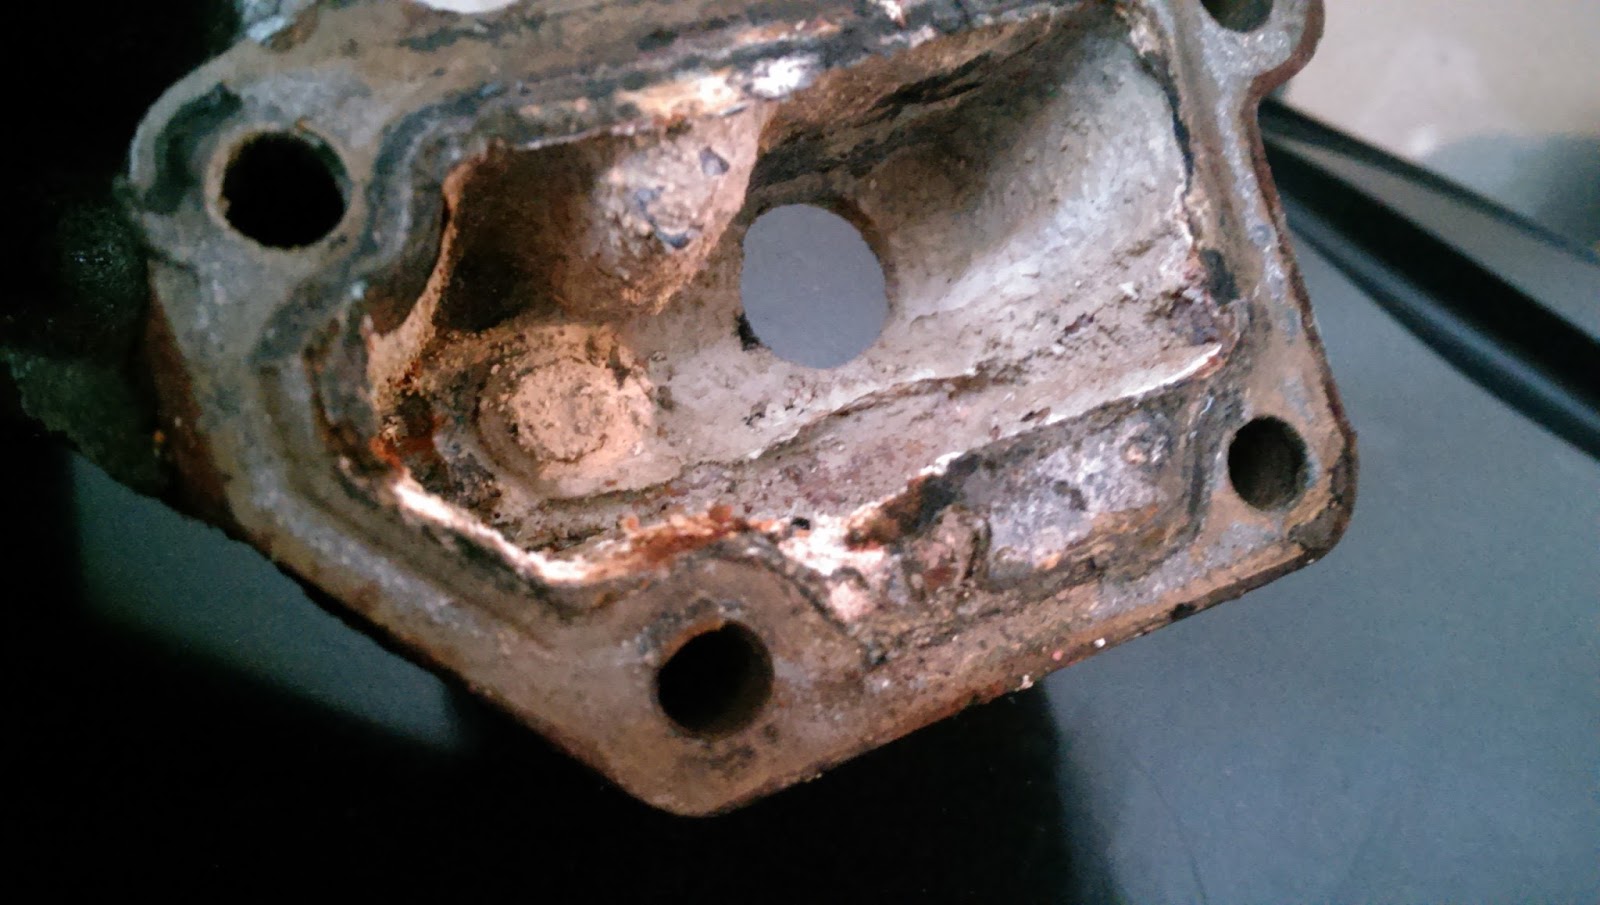
Started off taking the head, starter, and transmission off. At the house, I continued dis-assembly of the head, laying out all the parts to keep track of where they go. This stage brought on all kinds of new discovery. This engine, while it worked, probably could have died at any time. This was not well taken care of in the past. Rust, mineral deposits, carbon build up, and more. One of the studs holding the exhaust mixer was so rusted through, there was no effort to break it off when trying to loosen the nut. 


difference between old and new exhaust mixer

The water ways were well built up with deposits. The cap that holds the zinc on the head wouldn't come off, so I took the whole cover off with some difficulty and found out it was so built up, it was completely blocked, nothing left from the zinc, and the deposits were holding onto the cover tightly. There was plenty of deposits by the thermostat housing too. You could see the layers as if it were the Grand Canyon. It took a LONG time to get it built up like that.


Zinc cover

thermostat cover is green


behind thermostat

backside of thermostat housing

Front size of thermostat housing


valve condition


piston condition


In addition to these pictures above, there's also plenty of rusty areas to go around. I have various wire brushes either for a dremel or for a drill to get those parts cleaned up. While I have these parts at the house now, I plan to get the rest of the engine off the boat to bring to the house to continue the rebuild. I'm also putting together a shopping list that will go into the rebuild. Lots of gaskets, hoses, pipes and more.

8 January, I got the marina owner and one of his workers to help me out getting the rest of the engine off the boat and into the back of my truck. Started to clean off the top of the head and carbon off the pistons. They were starting to look better, but found out an issue with the aft piston.

front piston

aft piston, with a nice crack in it

Since finding a crack in the piston is a fairly major issue, that means more things are coming apart and more parts need ordered.

For the time I'm working on the block, I placed the engine on a furniture dolly that I can wheel around as needed.


I got both pistons out. The forward one wasn't too bad. Just a bit of carbon buildup above the first ring but that looks like it would be considered normal for a piston. The cracked one I took out first though. When I first looked down the side, I thought the crack only went down to the first ring but then I noticed a crack between the first and second ring that ended up being a broken piece. I then noticed the crack went down to the pin opening that holds the piston to the connecting rod. The crack could also be seen from underneath. One person told me he is surprised that there was still any compression in that cylinder with how this piston looks. Both will be replaced so they start off with the same wear on them.


Lots of issues found on this engine. Some surprising and some expected.

-----

Cleanup phase

With all the deposits that have built up in the water ways, I looked into how to take care of it. I came across a product called Rydlyme. Other boaters have used it to run through their engines or heat exchangers to clean things out. I decided to order a couple gallons of it and tested it out on a couple smaller pieces.

So that picture of the thermostat housing above shows the first piece I decided to try out. After about half an hour, it looked like this.


After some additional cleaning with the dremel wire brush, it looked a whole lot better. I was even able to get the temperature sender off, with lots of effort. Let's say a 2x4 was very helpful to get that thing off. Here's how it looked. The wet part was degreaser as I'm still working to clean it up at this point.


Another small piece was the zinc cover, as pictured above, it was heavily blocked and actually took longer for the Rydlyme to dissolve the build up. After a while, I was mostly satisfied with how it turned out and went to using the dremel again to get the hardest stuff off of it. At this point, I still couldn't get the cap off that the zinc was screwed into, but still, the Rydlyme made a BIG difference.


After dipping the head, the waterways came out nice and clean after a couple hours of soaking.


used lapping compound for a better seal

valve condition greatly improved.
Dropped off the cylinder head on 4 Jan, and picked it up a couple days later. I only had them do a hot tank cleaning and worked on the valve surface. I didn't have them smooth down the exhaust side. I figured I could try doing that part myself. The guy at the shop said I could try using JB Weld to fill in the pitting.

This thing really looks good now.


At this point, I started to clean up the exhaust port. I did a little sanding with 80 grit sandpaper just to see that there was an even surface with the sides. Next, I got some JB Weld, recommended by others, to fill in the low spots where it could be sanded down for a smooth surface where the new exhaust mixer and gasket will get a tight seal. After I sanded the JB Weld, I saw there were still some low spots, so I did another mixed and laid some more on top to fill it in.

sanded

JB Weld applied

Sanded smooth
-----

Finishing phase

Started doing some painting on a couple small pieces at first. The paint I used is VHT Engine Primer and Paint Enamels from Autozone. These are rattle can types that I've read good things about. I wanted to paint the engine a brighter color, so decided to paint it yellow. Then thought a few other items could be painted a contrasting color and went with orange for those pieces.

Started off with the air intake fitting that connects to the head. A few shots of grey primer then a few shots of the top coat of orange.


The thermostat housing is part of the head and the rest of the engine, so that got coats of yellow.


Thermostat cover

backside of thermostat cover


Air filter housing


Still a few more pieces that need some work but they can wait for now.

-----------------------

Reassembly


Rocker spacing setup completed


matching the orange with the oil filter was completely unintentional

Below pictures show the engine, mostly completed, mounted on 4x4's and just about ready for testing.


And, as of 26 March, the engine runs again. But I'll reveal that in the next post. :-)

Now, it'll be ready for the boat once I have a new fuel tank installed.